- JOpera for Eclipse
- About
- Documentation
- Manual
- JOpera Help
- 1. Introduction
- 2. Getting Started
- 3. Hello World Tutorial
- 4. Web Services Tutorial
- 5. Monitoring Widget Tutorial
- 6. Java Services Tutorial
- 7. Frequently Asked Questions
- 8. How To...
- 9. JOpera Visual Composition Language Reference
- 10. Feature Reference
- 11. Lineage Tracking
- 12. How to write Service Invocation Plugins
- 13. Library Reference
- 14. Component Type Reference
- 15. How to write Documentation
- Publications
- Research
- Screenshots
- Talks
- Videos
- Workflow Patterns
- FAQ
- Manual
- Download JOpera
- Forums
- Search
3. Hello World Tutorial
Wed, 10/13/2010 - 10:41 — frisonim
3.1: Creating a new Project
In order to create a new Project, right-click in the JOpera Navigator. You should see this view in the JOpera Design perspective.
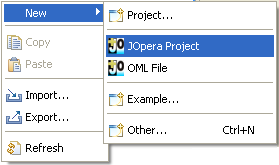
Figure 3.1: Creating a new JOpera project
New > JOpera Project. Choose an appropriate "Project name" ("test" in this case) and click on the "Finish" button.
3.2: Creating a new OML file
Now that you have an empty JOpera project, you can add OML files into it by right-clicking the project in the JOpera Navigator
and selecting New > OML File.
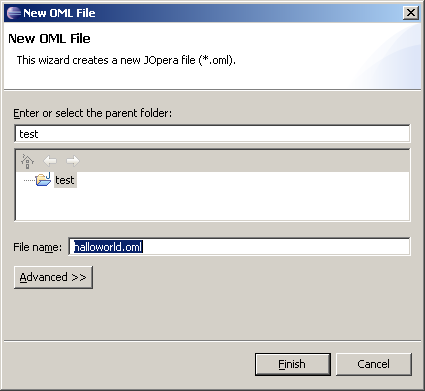
Figure 3.2: Creating a new OML file
3.3: Setting up the Hallo World Program
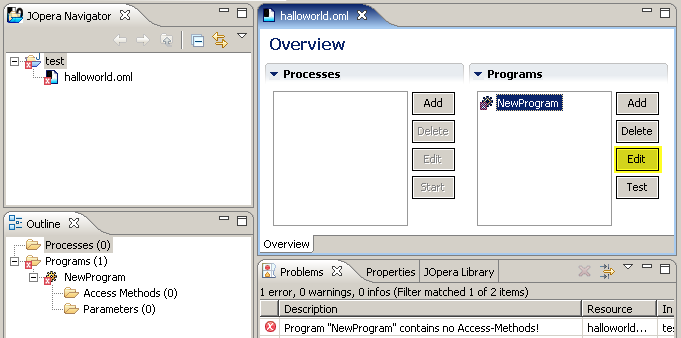
Before we can create a composition we need to define what are the components. In JOpera, we need to create some programs that will be later connected into a process. To do create the Hallo World Program:
- Click on the
Addbutton in the Programs overview - Click on the
Editbutton to edit theNewProgramNote: JOpera has found out that it cannot run this program and is reporting this in the
Problemsview. We will fix this in a minute. - Rename the program to
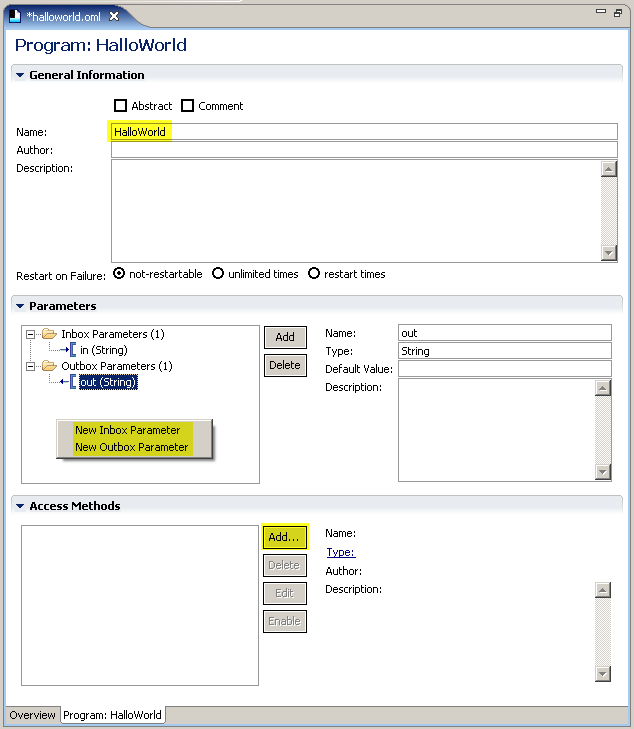
HalloWorld - The program is going to receive an input string and produce an output message. To exchange data, JOpera programs use input and output parameters, which are edited as shown in Figure 3.5:
- Add an Input Box Parameter and call it
in - Add an Output Box Parameter named
out
- Add an Input Box Parameter and call it
- To add an adapter describing how JOpera is going to run this program, click on the
Add...button within the Adapter (Access Method) section and:- Choose the
ECHOcomponent type from the list in the dialog box and clickOk. - Click on
Edit. - Then enter the following XML as input:
<out>Hallo %in%</out>
Note: See 14.6: JOpera ECHO for more information on the syntax used by the JOpera ECHO adapter to substitute parameter values into its output string
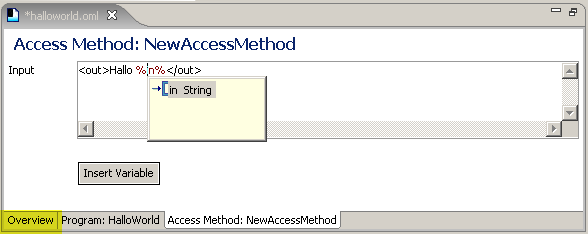
Figure 3.7: Entering the XML snippet to be returned by the program. You can get the list of input parameters by typing 'CTRL+Space'
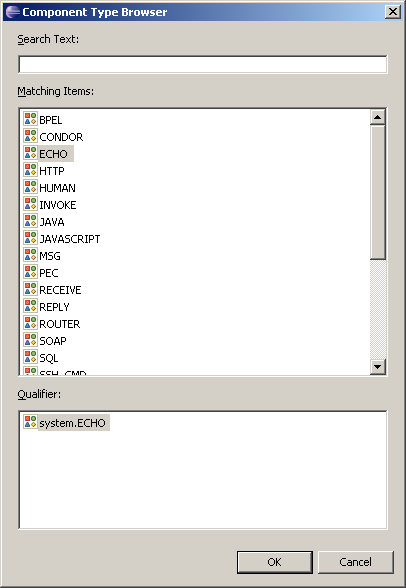
Figure 3.6: Choosing a component type for the new adapter (The content of this list may change depending on what JOpera plugins you have installed) - Choose the
- That's it. Now you can go back to the
Overviewpage to do a test run of the newHalloWorldprogram, as we are going to show you in the rest of the tutorial.
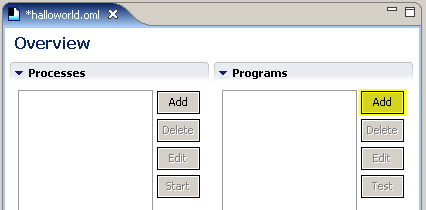
Figure 3.3: Adding a new Program
3.4: Running the Program with a test Process
Now that we have setup the HelloWorld program, we can run it by calling it from a test process.
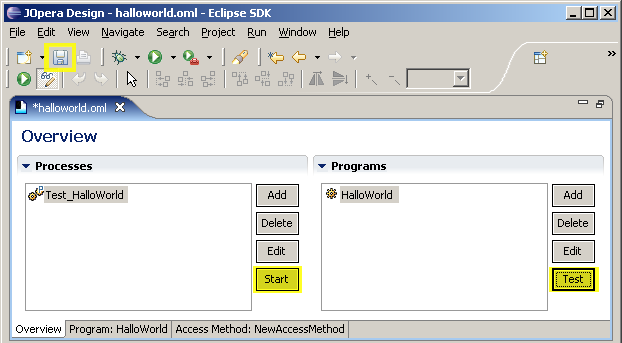
Figure 3.8: Generate a Test Process for the Program
- Select the
HalloWorldProgram and click on theTestbutton.Note: This will create a new process which contains a single activity which references the program you just added. The process has the same input and output parameters and, if you check the data flow view, they are already connected to your program, which is now ready to test.
- Save the OML file
Note: Make sure that the
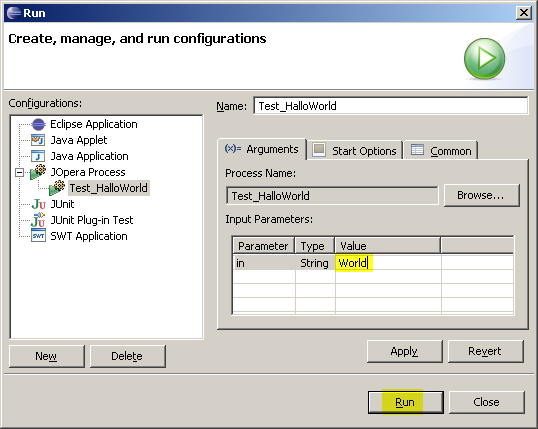
Project, Build Automaticallyoption is checked in the main Eclipse menu - Click on the
Startbutton to start the process. The button is located in theOverviewtab next to the list of processes, as shown in Figure 3.8. Since this is the first time, JOpera will prompt you to enter some values for its input parameters. - As shown in Figure 3.9, enter
Worldfor the input parameterinand clickRun.
3.5: Checking the Results
If all went well, the process runs very fast and is finished by the time Eclipse has switched to the JOpera Monitor perspective.
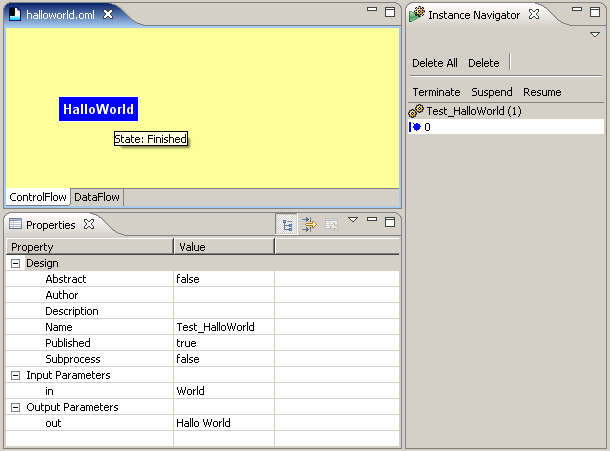
Figure 3.10: Check the results of the process in the JOpera Monitor perspective
- Look in the
Propertiesview for the values of the output parameters - Use the
Instance Navigatorview to manage the processes that are currently runningNote: Try to start more processes and see what happens