- JOpera for Eclipse
- About
- Documentation
- Manual
- JOpera Help
- 1. Introduction
- 2. Getting Started
- 3. Hello World Tutorial
- 4. Web Services Tutorial
- 5. Monitoring Widget Tutorial
- 6. Java Services Tutorial
- 7. Frequently Asked Questions
- 8. How To...
- 9. JOpera Visual Composition Language Reference
- 10. Feature Reference
- 11. Lineage Tracking
- 12. How to write Service Invocation Plugins
- 13. Library Reference
- 14. Component Type Reference
- 15. How to write Documentation
- Publications
- Research
- Screenshots
- Talks
- Videos
- Workflow Patterns
- FAQ
- Manual
- Download JOpera
- Forums
- Search
5. Monitoring Widget Tutorial
Wed, 10/13/2010 - 10:41 — frisonim
5.1: Introduction
The Monitoring Widget is a simple Web-based tool that allows the monitoring of the processes running on a remote server from a common Web browser. It is available since JOpera v2.3.6. This tool may be integrated and executed within any HTML web page by embedding a chunk of code within the page.
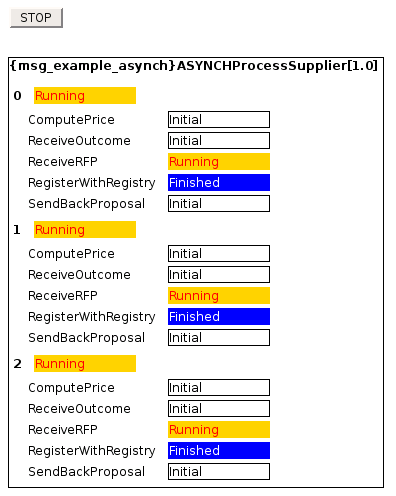
Figure 5.1: Monitoring a Running Process
{msg_example_asynch}ASYNCHProcessSupplier[1.0]
process is described by the states of their tasks.
Each task has a name on the left and a colored rectangle at the right.
The color, that may change over time, defines the current state of the task.
On the top there is a STOP button, that when clicked, terminates the execution of the monitoring widget, which may
further be restarted by clicking again on the same button.
Note:
Clicking on the STOP button will not stop the execution of the process but only pause its monitoring by the widget - the Stop button can be hidden using CSS
5.2: Adding a Monitoring Widget
In order to use the Monitoring Widget, you need to add some lines of code to your HTML Web page.
Note: Multiple Widgets can be added to the same page
-
Load the widget API by adding the following line into the HTML head element:
The
Figure 5.2: Include the widget API in the page headerjopera.jsscript is served by JOpera's embedded Web server - Choose which process should be displayed:
-
Create a
divcontainer where the widget will be placed: Theidof thedivelement has to be the same as the first argument used to initialize theTaskDisplalyerwidget object.
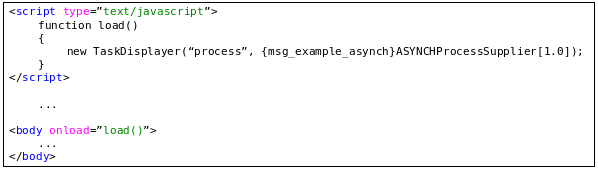

5.3: Example
Copy and Paste this example HTML code in your page to get started:
<head>
 <script src="http://localhost:8080/ui.v2/scripts/jopera.js"></script>
 <script>
  function load() { new TaskDisplayer("process"); }
 </script>
</head>
<body onload="load()">
 <div id="process"></div>
</body>
5.4: TaskDisplayer API
There are three ways for creating the Monitoring Widget depending if you want to display all process, or only a single process, and in this case, if you are interested in a particular instance or in all the instances.
-
Display all processes:
Where the argument
processis theidof thedivelement where the widget will be displayed. - Display a single process with all pf its instances: Where the second argument is the name of the process.
- Display a single process with a specific instance: Where the third argument is the instance number.


