- JOpera for Eclipse
- About
- Documentation
- Manual
- JOpera Help
- 1. Introduction
- 2. Getting Started
- 3. Hello World Tutorial
- 4. Web Services Tutorial
- 5. Monitoring Widget Tutorial
- 6. Java Services Tutorial
- 7. Frequently Asked Questions
- 8. How To...
- 9. JOpera Visual Composition Language Reference
- 10. Feature Reference
- 11. Lineage Tracking
- 12. How to write Service Invocation Plugins
- 13. Library Reference
- 14. Component Type Reference
- 15. How to write Documentation
- Publications
- Research
- Screenshots
- Talks
- Videos
- Workflow Patterns
- FAQ
- Manual
- Download JOpera
- Forums
- Search
6. Java Services Tutorial
Wed, 10/13/2010 - 10:41 — frisonim
Before we can continue with the Wizard, we need to configure at least one classpath entry.
To do so, click on
6.1: Java Snippets
Java Snippets are short pieces of Java code that can be very efficiently embedded into a JOpera process. The code of a Java snippet is any valid Java code that can be written inside a Java method. In the first part of this tutorial you will learn how to setup a JOpera program that calls a Java snippet to multiply two floating point numbers.
6.1.1: Calling Java Snippets from a JOpera Program
- Create a new Program and call it
Multiply - Create two input parameters called
a,band assign them a type offloat - Create one output parameter called
resultalso of typefloat
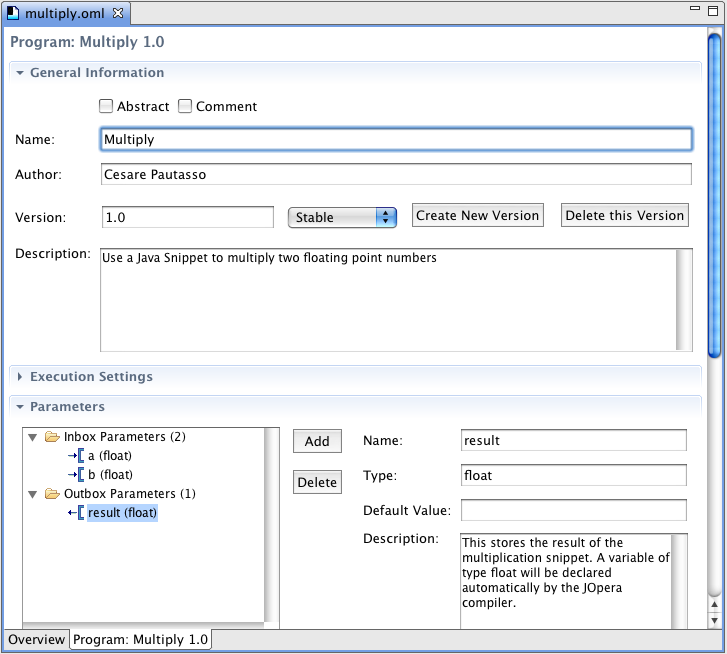
Figure 6.1: Setting up the multiply program interface
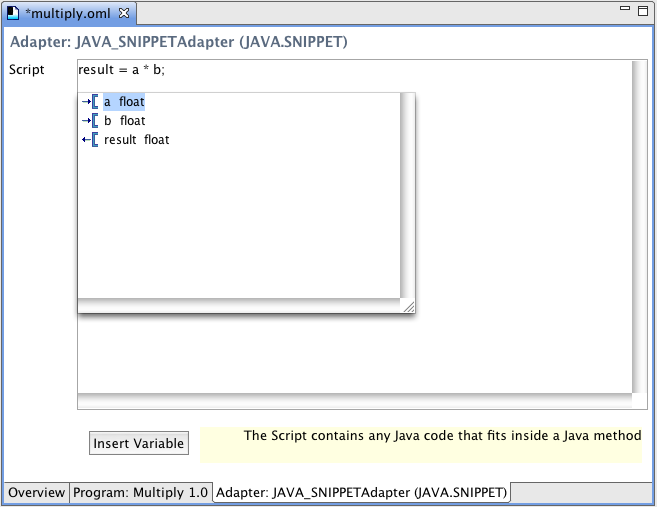
Adapters section and as shown in Figure 6.2:
- click on the
Add...button. - Select the
JAVA.SNIPPETcomponent type - Click
OKto close the Component Type Browser

Figure 6.2: Select the Java Snippet Component Type
- click on the
Adapter: JAVA_SNIPPETAdaptertab. - Enter the code to multiply two numbers
result = a * b;
directly in theScriptparameter, as shown in Figure 6.3 - Click on the
Insert Variablebutton to display which parameter variables have been declared
6.1.2: Testing the Java snippet
To test the snippet, we will create a Test process and run it.
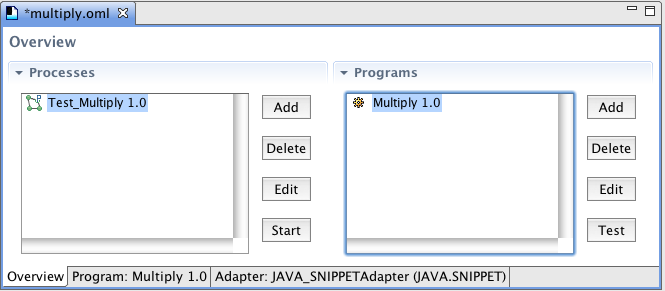
- Click on the
Overviewtab - Select the
Multiplyprogram - Click on the
Testbutton, this will generate a new test process calledTest_Multiplyand your file will look like Figure 6.4 - Click on the
Startbutton - Make sure the file is saved
- Enter two values for the
a,bparameters in the run configuration (Figure 6.5)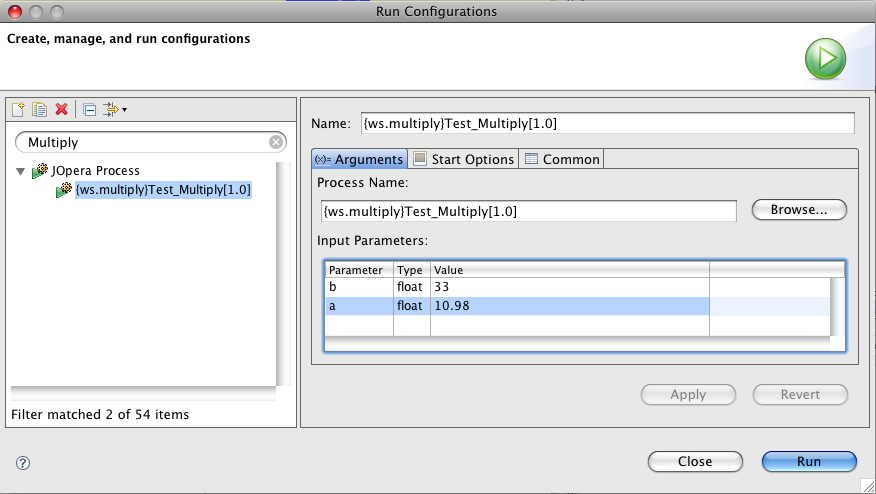
Figure 6.5: Enter the input parameter values to test the Java snippet - Click on
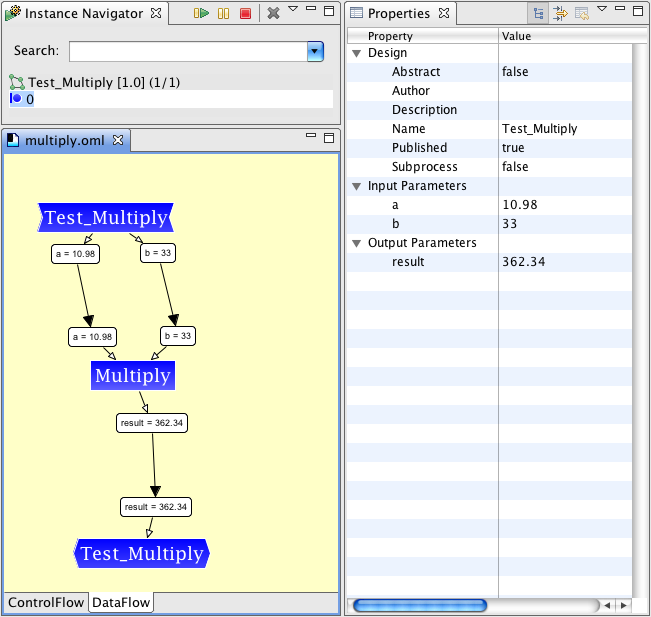
Runto start the process - JOpera will switch to the Monitor perspective and you can check the results of the process (Figure 6.6) You can find a solution for this tutorial in example file called "tutorial_snippet.oml". As an exercise try to replace the existing snippet with another one doing a division. What happens if you run the process passing a "0" value?
6.2: Java Methods
JOpera tasks can be used to invoke local Java methods. Tasks input and output parameters can store any Java serializable object. In this section we present a step-by-step guide on how Java code can be called from JOpera programs. On http://www.jopera.org/download/demos you can find the complete Java/JOpera Eclipse project used in this section of the tutorial.
6.2.1: Importing Java Classes
The JOpera Java Import Wizard can be used to generate JOpera programs corresponding to Java methods.
You can launch the Wizard selecting it from the File | Import... main menu (Figure 6.7).
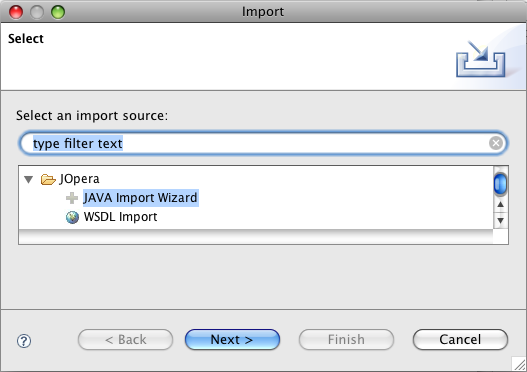
Figure 6.7: Launch the JOpera Java Import Wizard
Step 1 - Selecting the ClassPath
The first page of the Java Import Wizard (Figure 6.8)is used to configure the Java ClassPath that will be used to locate the classes that will be called from the JOpera workflow.
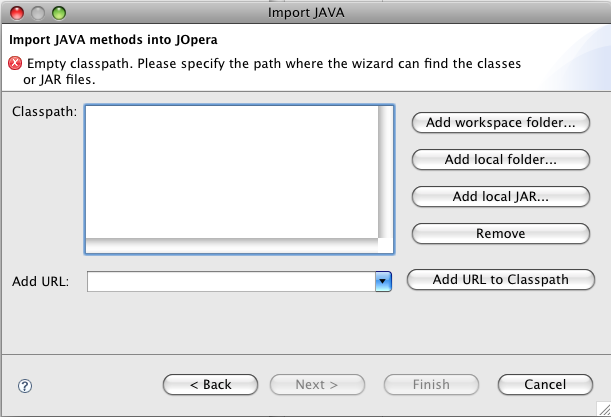
Figure 6.8: Launch the JOpera Java Import Wizard
| Adding classpath entries | |
|---|---|
| Add workspace folder |
Select a folder from the current Eclipse workspace. The folder should be the root binary folder of a Java Project (e.g., called bin or classes). |
| Add local folder |
Select a folder within the local filesystem. Also in this case, the folder (or its subfolders, if you are using packages) should contain the compiled Java .classes files |
| Add local JAR | Select classes from a JAR file found on the local filesystem. |
| Add URL to Classpath |
Add an arbitrary URL to the classpath. The URL to be added is entered in the box labeled Add URL:. |
| Remove | Remove the selected classpath entries. |
Add workspace folder and select the bin folder of the project called java-code as shown in Figure 6.9.
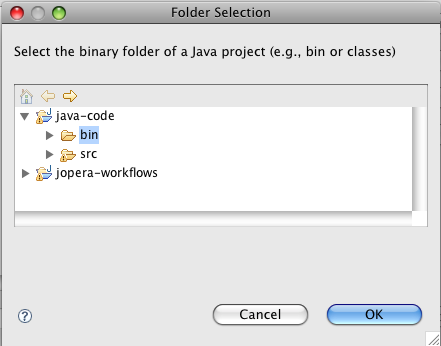
Figure 6.9: Select the binary folder of a Java project in the workspace
Step 2 - Selecting the Methods
Once the classpath is configured, the next page of the wizard lets you choose which methods should be called from JOpera.
Note:
The list of methods is automatically populated if you imported JAR files. Otherwise you have to manually enter
the fully qualified Java class name in the box labeled Add Class (not in Jar) and click on the Add Class button, before you can select the methods.
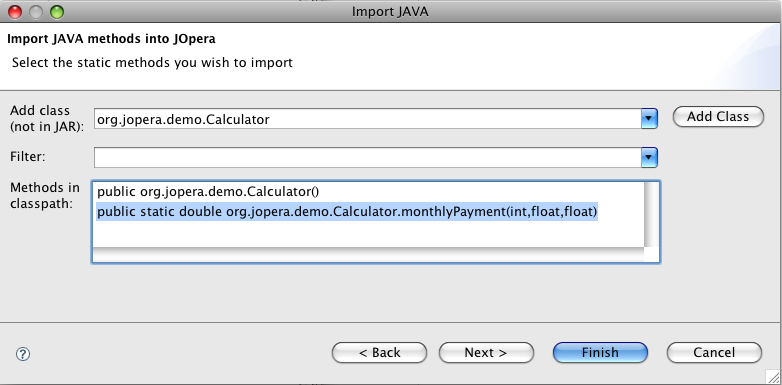
Figure 6.10: Select the methods to be called from JOpera
org.jopera.demo.Calculator as the Java class name and select the monthlyPayment static method.
Once the methods have been selected, you can click directly on Finish to generate the JOpera programs used to call the selected methods.
Instead, if you would like to choose where to place the generated .oml file, click on next, enter the Target Container as one of your JOpera projects and then click on Finish.
An .oml file named after one of the classes you selected (in our example, the file will be called org.jopera.demo.Calculator_java.oml.
6.2.2: Calling Java Methods
JOpera can call three kinds of Java methods:
- Java static methods
- Java constructors
- Java public methods of objects
Note: Once a Java object has been instantiated from a JOpera process, it is possible to call multiple methods on the same object (either sequentially or in parallel depending on the control flow of the JOpera process)
Calling Static Methods
To see how to call Java static methods from JOpera after importing the Java classes as .oml files, you should:.
- Open the file
org.jopera.demo.Calculator_java.omlthat was generated when importing theorg.jopera.demo.CalculatorJava class as described in 6.2.1: Importing Java Classes - Select the
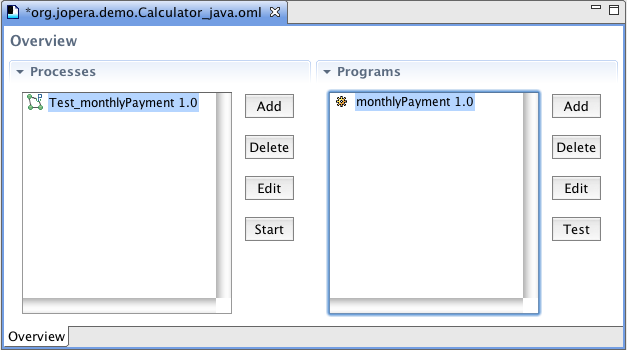
monthlyPaymentprogram - Click on the
Testbutton, this will generate a new test process calledTest_monthlyPaymentand your file will look like Figure 6.11 - Click on the
Startbutton - Make sure the file is saved
- Enter the values for the input parameters in the run configuration (Figure 6.12) These parameters correspond to the parameters of the Java method to be called (unfortunately the import wizard does not preserve parameter names but only the typing/order)
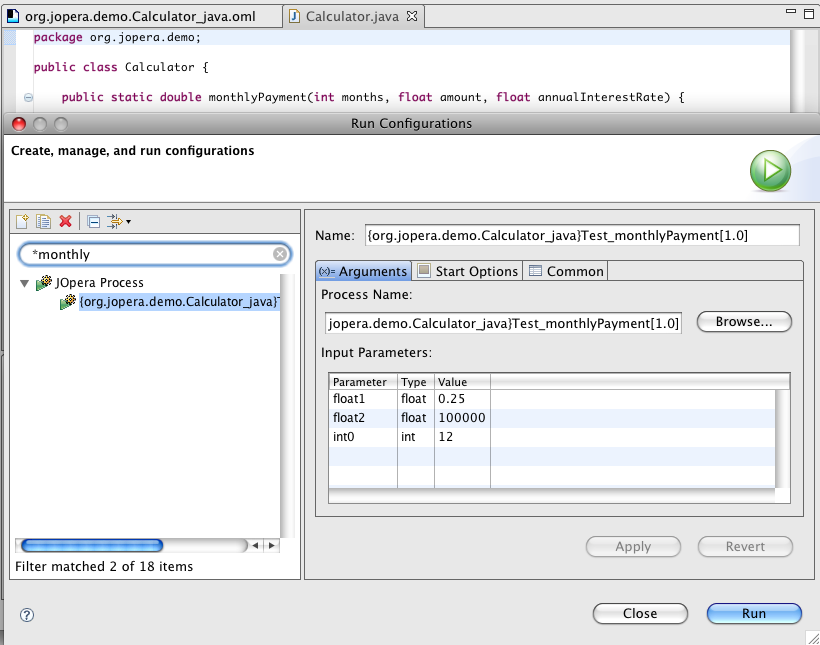
Figure 6.12: Enter the input parameter values to test the Java snippet - Click on
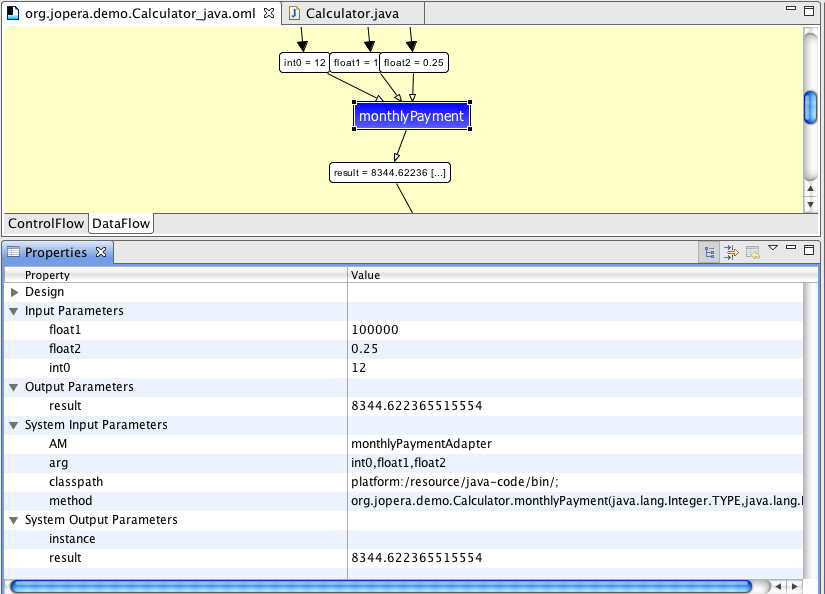
Runto start the process - JOpera will switch to the Monitor perspective and you can check the results of the process (Figure 6.13) Notice that the value returned by the method is stored in the return output parameter of the corresponding task
Calling Constructors
Calling constructors works in the same way as calling static methods, with one difference: the constructor instantiates an object.
The newly created object is stored in the SYS.instance system output parameter of the task. A reference to it is also returned in the result output parameter of the task.
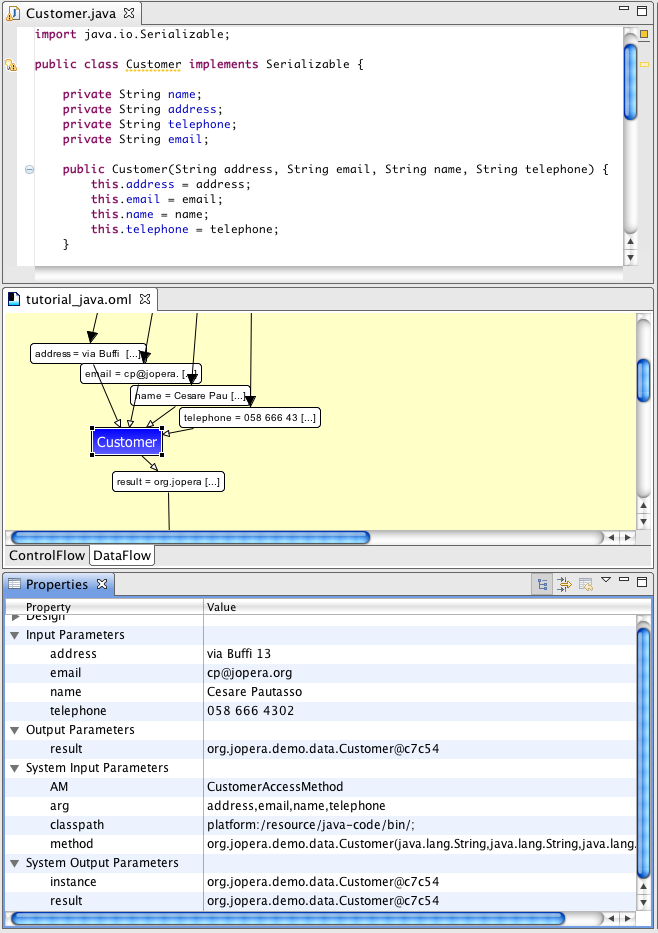
Figure 6.14: Monitor the invocation of a Java constructor
Serializable -- can be passed through the data flow of a JOpera process and sent to other tasks as input.
These tasks, for example, can be bound to Java snippets and Java method invocations.
Calling Public Object Methods
Once an object it has been created, it is possible to pass it around the data flow of a process, but also to invoke its methods from the tasks of the process.
To do so, the task bound to the Java method call adapter needs to be also dynamically bound to the object on which to call the method.
In JOpera this is done using the system input parameter SYS.instance. This should be connected to the result output parameter of the constructor (or the static method)
returning the reference to the object (Figure 6.15).
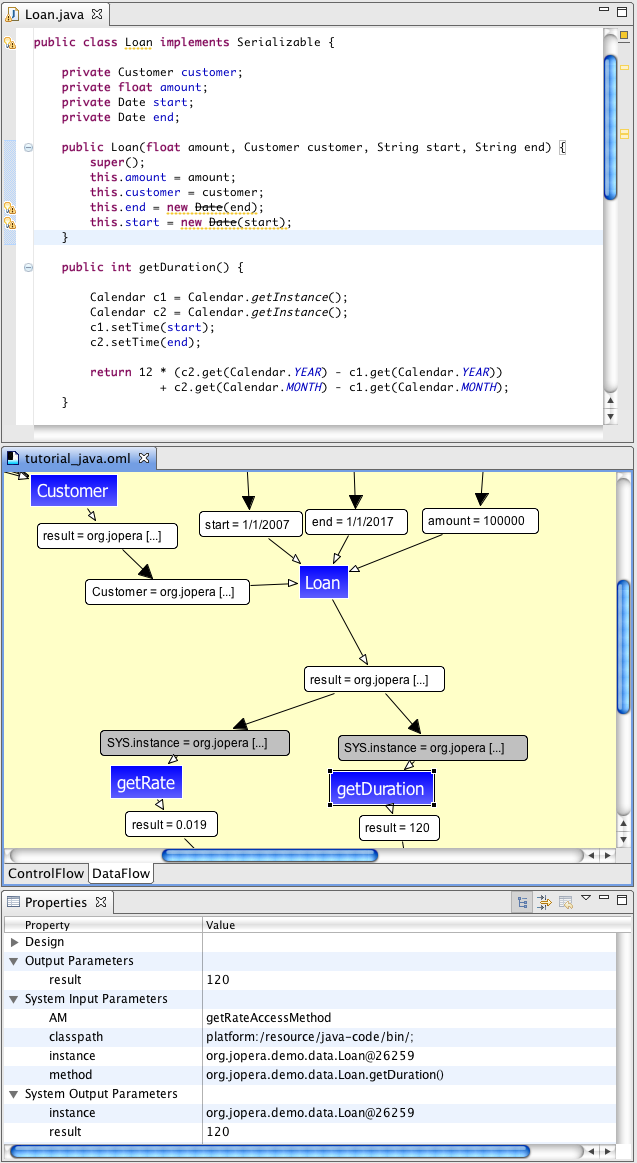
Figure 6.15: Monitor the invocation of a Java method on an object
6.3: Java Tips
6.3.1: Setting up Project Dependencies
It is recommended to keep the JOpera projects containing the workflows separate from the Java project containing the Java code. In order for the JOpera compiler to find the Java object type declarations the JOpera project build path should be configured to include the Java projects (Figure 6.16).
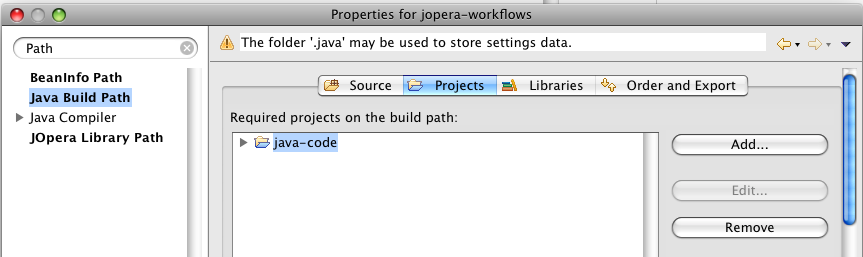
Figure 6.16: JOpera projects can require Java projects to use custom Java data types in parameter declarations
6.3.2: Working with Objects as parameter types
Especially when working with Java snippets, it is possible to pass to and from the Java snippet some Java objects by using their fully qualified class name to declare the parameter type of the corresponding JOpera program.
6.3.3: Changing the Java code
After making changes to the Java code it is recommended to do a full rebuild of the entire workspace (i.e., the Java projects but also the JOpera projects using the Java code) in order for JOpera to clean up its class loader cache and make it call the latest compiled version of the code.
6.3.4: Displaying Objects
JOpera uses String.valueOf() to convert to a String the value of Java objects stored in JOpera parameters so that it can be displayed in the Monitor. If you override the toString() method then you can display in the JOpera Monitor whatever object representation you may find useful both for debugging and for visualization purposes.