- JOpera for Eclipse
- About
- Documentation
- Manual
- JOpera Help
- 1. Introduction
- 2. Getting Started
- 3. Hello World Tutorial
- 4. Web Services Tutorial
- 5. Monitoring Widget Tutorial
- 6. Java Services Tutorial
- 7. Frequently Asked Questions
- 8. How To...
- 9. JOpera Visual Composition Language Reference
- 10. Feature Reference
- 11. Lineage Tracking
- 12. How to write Service Invocation Plugins
- 13. Library Reference
- 14. Component Type Reference
- 15. How to write Documentation
- Publications
- Research
- Screenshots
- Talks
- Videos
- Workflow Patterns
- FAQ
- Manual
- Download JOpera
- Forums
- Search
2. Getting Started
Wed, 10/13/2010 - 10:41 — frisonim
2.1: Installation
Installing JOpera for Eclipse is done in a few steps:
- Start Eclipse.
Note: If you do not already have an installation of Eclipse 3.6, download it from http://www.eclipse.org , unzip it, and start it.
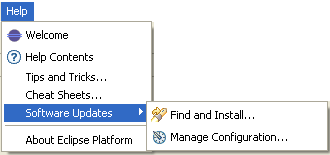
- Select the
HelpMenu and click onSoftware Updatesand then onFind and Install...SelectSearch for new features to installand push theNextbutton. - Push the
New Remote Site...button on the top right. Enter JOpera as name and http://www.update.jopera.org/ as URL and hit theOkbutton.
Then check/select the box of the newly created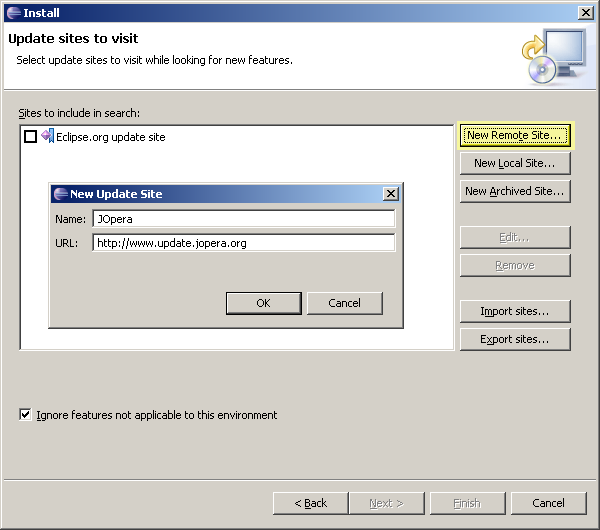
Figure 2.2: Adding the JOpera Update SiteJOperasite as well as of theEclipse.org update siteand push theNextbutton. - It will take a while until the features list is updated. From the updated list select
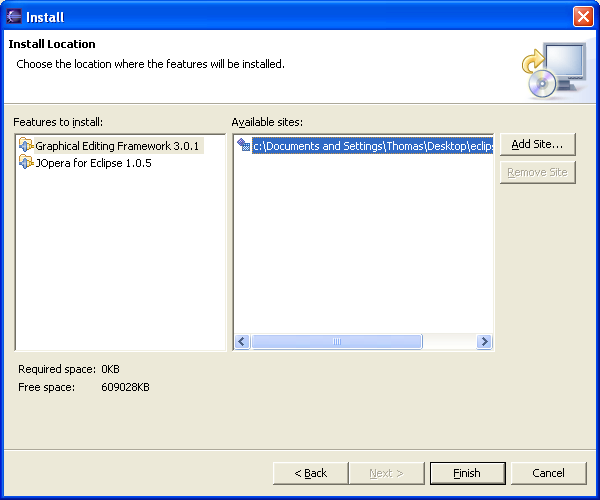
JOpera for EclipseandGraphical Editing Framework 3.0.1. Then click onNext. Accept the license agreements on the next page for both features. If you do not have write permission in the Eclipse directory, press theAdd Site...button and point to a location where you have write permission. Make sure you selected the newly added site. In any case, proceed by hitting theFinishbutton and press theInstallbutton for each feature as soon as prompted. - You will now be asked if you want to restart Eclipse. Press
Yesand you should be all set as soon as Eclipse has been restarted. - That's it: Enjoy JOpera for Eclipse!
2.1.1: Installation from the Command Line
To install JOpera on Eclipse 3.6 (Helios) from the command line you can use the P2 director as follows:
./eclipse -application org.eclipse.equinox.p2.director -repository http://www.update.jopera.org/,http://download.eclipse.org/releases/helios -installIU org.jopera -nosplashTo install the JOpera server, use this other command on a different instance of Eclipse:
./eclipse -application org.eclipse.equinox.p2.director -repository http://www.update.jopera.org/,http://download.eclipse.org/releases/helios -installIU org.jopera.server -nosplashOn older versions of Eclipse (3.5 and earlier), it is also possible to install JOpera using the Eclipse command line update application.
./eclipse -application org.eclipse.update.core.standaloneUpdate -command install -from http://www.update.jopera.org/old/2.5.0/ -featureId org.jopera -version 2.5.0For each JOpera feature, you will need to know its latest version number and its featureId. Use the following for a complete install of JOpera Visual Composition Environment
./eclipse -application org.eclipse.update.core.standaloneUpdate -command install -from http://www.update.jopera.org/old/2.5.0/ -featureId org.jopera -version 2.5.0
./eclipse -application org.eclipse.update.core.standaloneUpdate -command install -from http://www.update.jopera.org/old/2.5.0/ -featureId org.jopera.subsystems -version 2.5.0
./eclipse -application org.eclipse.update.core.standaloneUpdate -command install -from http://www.update.jopera.org/old/2.5.0/ -featureId org.jopera.feature.log -version 2.4.8
./eclipse -application org.eclipse.update.core.standaloneUpdate -command install -from http://www.update.jopera.org/old/2.5.0/ -featureId org.jopera.subsystems.ws -version 2.4.2
./eclipse -application org.eclipse.update.core.standaloneUpdate -command install -from http://www.update.jopera.org/old/2.5.0/ -featureId org.jopera.subsystems.gs -version 2.5.0
./eclipse -application org.eclipse.update.core.standaloneUpdate -command install -from http://www.update.jopera.org/old/2.5.0/ -featureId org.jopera.www -version 2.5.0
Alternatively, to install the JOpera Server, use the following:
./eclipse -application org.eclipse.update.core.standaloneUpdate -command install -from http://www.update.jopera.org/ -featureId org.jopera.feature.server -version 2.5.0
Note: The server must be installed on a separate Eclipse instance then the JOpera Visual Composition Environment
2.1.2: System Requirements
The JOpera for Eclipse currently requires Java JDK 1.5 and a working installation of Eclipse 3.6 There are no specific requirements regarding operating system. You may use it on any OS where the Java JDK as well as Eclipse work. It has successfully been used on Windows XP, Vista, 7, Linux and MacOS/X platforms.
2.2: Running JOpera for Eclipse
JOpera for Eclipse is started by running Eclipse. All you may need to do is switching to one of the JOpera perspectives. In case you need to switch to the JOpera perspective manually, you can do so by clicking on Open Perspective and then on Other in the Window menu. Then choose either JOpera Design or JOpera Monitor in the Select Perspective dialog.
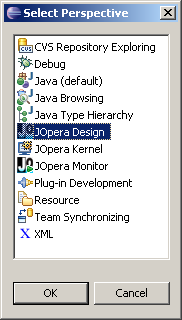
Figure 2.4: Switch to a JOpera perspective
2.3: Upgrade
To keep your JOpera for Eclipse up-to-date, just use the Eclipse Update Manager regularly. Make sure to do a full rebuild of your workspace after upgrading.
2.4: Basics
2.4.1: Service Composition with Processes
JOpera is a tool to build composite systems out of components. These components can be of many different types, including SOAP/REST Web Services, UNIX applications, Windows applications, Java snippets, XPath queries and many others. The structure of such composite system is defined with a Process, which defines the control and data flow between the various components.
2.4.2: Design-Time User Interface
JOpera basic interfaces comes with two perspectives: Design and Monitor. The Design Perspective is used to model and define your processes. The Monitor perspective is used to watch the processes as they run.
These perspectives give you access to a set of views that complement the Editor of JOpera's OML files.
In the Design Perspective, these views include:
- the JOpera Navigator (manage your OML files)
- the Outline (view and edit the structure of an OML file)
- the Properties (set properties of selected JOpera elements)
- the Problems (see JOpera errors and warnings, updated in real time)
- the JOpera Library (reuse your processes and programs)
JOpera Navigator
The JOpera Navigator gives you an overview of all the JOpera projects you have in your workspace and all OML files therein. Right clicking in this pane lets you create a new JOpera project or a new OML file. It also enables you to import WSDL descriptions of Web Services or JAVA classes. Double-clicking on any of the OML files will open the corresponding JOpera Editor.
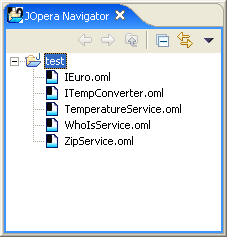
Figure 2.5: The JOpera Navigator
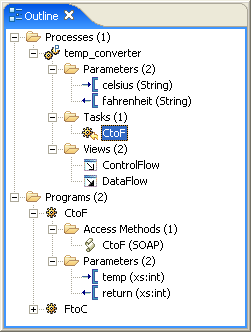
Outline
The outline gives you a brief overview over everything contained in an OML file. This includes the processes and their parameters, tasks and views as well as the programs and their parameters and Adapters. Double-clicking on either of these will open a detailed view in the Editor. Right-clicking in this pane lets you add and delete various elements (Processes, Programs, Parameters, Activities, SubProcesses) to the OML file.
Editor
The Editor lets you have a more detailed view on the OML files and lets you edit them. You can in particular add new processes, populate them with tasks, add or remove parameters and define the data and control flow graphs by switching among the various pages.
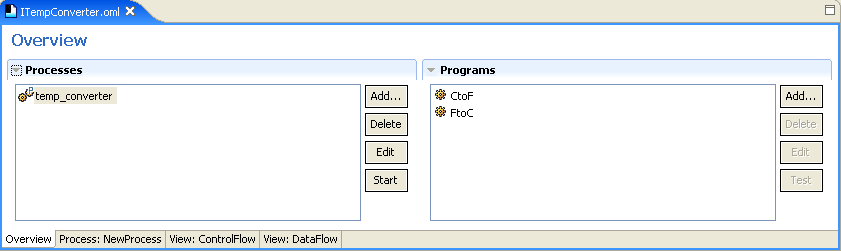
Figure 2.7: The Overview page of the OML Editor
Problems and Properties Views
The Problems View shows if there are any problems in the process you are currently working on. The process will not run as long as there are errors in it. In some cases, JOpera provides a Quick Fix. Clicking on the Properties View will show any defined properties of the object selected in the graphical part of the editor.
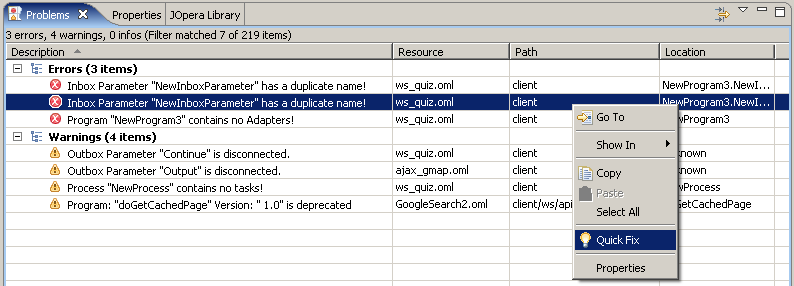
Figure 2.8: Look out for JOpera Errors and Warnings in the Problems View
JOpera Library
The JOpera library displays what are the currently available programs and processes that can be composed. Like with the Outline, to add a new task to a process, you can drag and drop selected elements into a data or control flow view of an Editor. Displayed elements can be interactively searched and browsed by grouping them using several criteria.
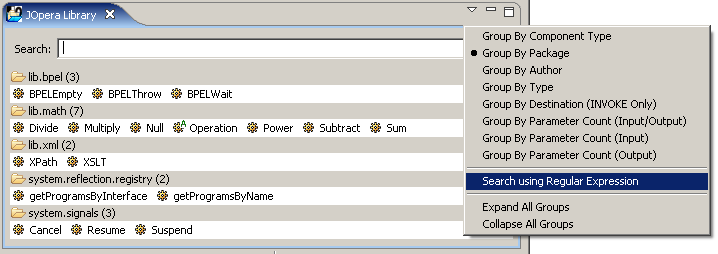
Figure 2.9: The JOpera Library view showing the Standard JOpera Library
2.4.3: Compiling Processes
Before you can run a process, it needs to be compiled. This is done automatically as soon as you save an OML file. All you need to make sure is that in the menu Project, Build Automatically is selected. Alternatively you can compile the process by selecting Build All in the Project menu.
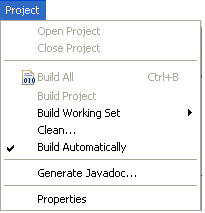
Figure 2.10: Building the Processes automatically
2.4.4: Deploying Processes
After they are compiled, processes will be deployed automatically and transparently so that they will be immediately ready for execution.
Note:
It is possible to redeploy all processes with a Project, Clean...
2.4.5: Running Processes
In order to run a process, click on Run... in the Run menu. In the Run dialog, select the JOpera Process launcher and then click the New button. This will create a new launch configuration to execute a process. Choose the process which is to be executed by pressing the Browse button and the select the process in the new dialog. Now complete the launch configuration by filling in the values for each of the process input parameters. The process will be started as soon as you click on Run.
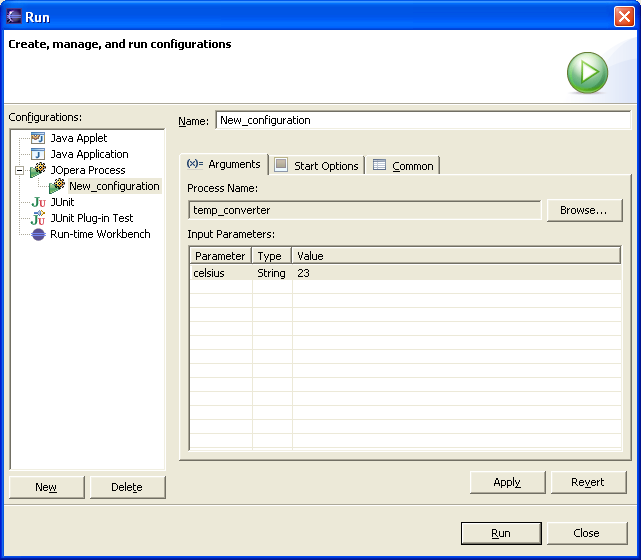
Figure 2.11: Configure a new launch configuration for a JOpera Process
2.4.6: Monitoring Processes
At run-time, in the Monitor Perspective, you have also access to additional debugging and monitoring views:
- the Instance Navigator (see what processes are running)
- the Properties and the Parameter Viewer (see what are the values of selected parameters)
- the JOpera Stack (check which process is calling this process)
- the Kernel Memory Inspector (look at the entire state of the running processes, for advanced users)
- the Kernel Console (command line, development interface to JOpera's execution kernel)
Instance Navigator
The Instance Navigator gives an overview over all of the processes that JOpera is (or has been) running. The color of the dots indicates their current state. You can get more details on a running process instance by clicking on it, which will open (or switch) to the corresponding graphical editor. This view also let you interact with processes, where they can be terminated (or killed), suspended/resumed and even deleted.
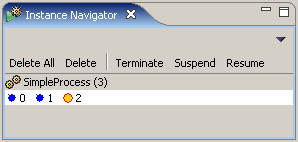
Figure 2.12: The instance navigator view
Monitoring Processes in the Editor
Please note that in the monitor perspective you no longer can edit the processes as they are being executed by JOpera. Instead:
- the editor will change the color of the task boxes according to their current state of execution. An orange box indicates that a service is currently being invoked (JOpera is waiting for a response). A box will then switch to blue when a successful invocation has finished and red, when something has failed
- In the data flow view (shown in Figure 2.13), parameters boxes will show the first few characters of their content
- when hovering the mouse over a parameter box, JOpera will show you a tooltip with its current value
- you can also select a task box to read information about its runtime execution state in the Properties view. Additional information (e.g., performance related) is shown when showing the advanced properties
- for very long parameter values, you can show their full content in the Parameter Viewer
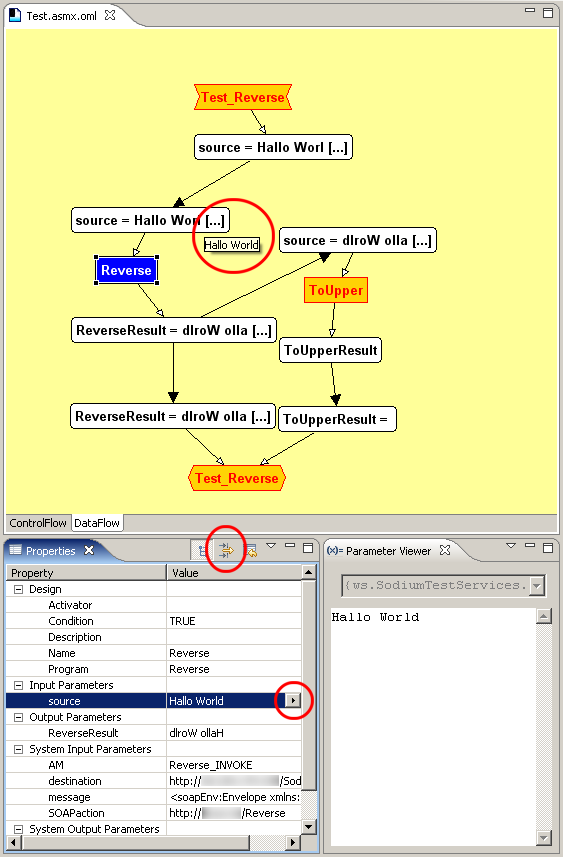
Figure 2.13: Editor in the Monitor Perspective working together with the Properties and Parameter Viewer
JOpera Stack
The process instances calling the currently selected one can be listed by opening the JOpera Stack view. Double click on a process instance shown on the Stack to open it in an editor.
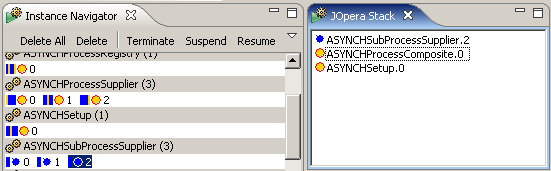
Figure 2.14: The JOpera Stack view working together with the Instance Navigator
Advanced Debugging Support
More low-level details about the progress of the execution can be seen in the Kernel Memory Inspector view, which shows a table with all parameter values and can be searched (by typing a parameter name in the Filter box) or filtered interactively by clicking with the mouse on the interesting processes and tasks.
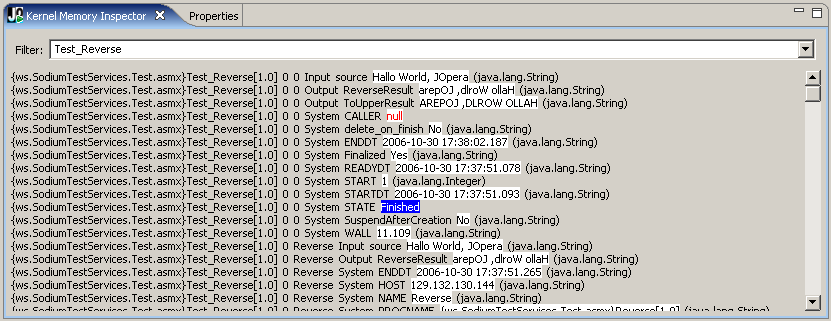
Figure 2.15: The Kernel Memory Inspector
2.5: Examples
A large set of examples is included with JOpera.
You can load them into your project workspace by using the New > Examples... menu command of Eclipse.
The following non-exaustive list describes some of the available examples.
Watch the video at
http://www.jopera.org/docs/videos/dag
to learn how to create and run an example file.
Note: The available examples may depend on the set of installed JOpera features
| Basic Examples | |
|---|---|
| halloworld.oml | Example used in: Chapter 3: Hello World Tutorial. |
| math_factorial.oml | Example showing how to write a recursive process. |
| loan.oml | Classical Loan Processing example. |
| ajax_gmap.oml | Center a Google Map at the given address. |
| ecommerce.oml | Classical Customer/Supplier/Shipment Warehouse example (featuring asynchronous interactions). |
| foreach.oml | Simple parallel for each example |
| dir.oml | Compute the size of all files in a folder (in parallel) |
| Web Services Examples |
Note: These examples may not always work due to the age of the Web services employed. If you find a suitable replacement Web service, let us know! |
|---|---|
| ws_quiz.oml | Example showing how to call a Trivial Quiz Web Service. |
| ws_eliza.oml | Example showing two different ways to make an Eliza Web Service chat with herself. |
| Mashup Examples | |
|---|---|
| yahoo.oml | Show Yahoo Local search results on a Google map. |
| mashup_doodlemap.oml | Use Yahoo Local search results to initialize a doodle poll, which is then shown on a Google map. |
| mashup_maptube.oml | Show a Google map where YouTube videos are positioned interactively. |
| Component Type Examples | |
|---|---|
| echo.oml |
Example for the ECHO component type. |
| bpel_example.oml |
Example for the BPEL component type using the lib.bpel library. |
| msg_example_asynch.oml |
Example for the MSG component type, showing a complex e-business asynchronous interaction where a client interacts with a set of suppliers through a broker composite process. |
| msg_example_cs.oml |
Example for the MSG component type, showing a simple asynchronous interaction pattern between a client and a server process. |
| notepad.oml |
Example for the UNIX component type, showing how to run the notepad.exe Windows application from a process. |
| ssh_date.oml |
Example to run the date command through a remote SSH connection. |
| Workflow Patterns Examples | |
|---|---|
| patterns.oml | The workflow patterns. (More information in Chapter 9: JOpera Visual Composition Language Reference) |
| signals_example.oml |
Examples using the system.signals library showing how to cancel, suspend and resume the execution of a process from within the process itself. |