- JOpera for Eclipse
- About
- Documentation
- Manual
- JOpera Help
- 1. Introduction
- 2. Getting Started
- 3. Hello World Tutorial
- 4. Web Services Tutorial
- 5. Monitoring Widget Tutorial
- 6. Java Services Tutorial
- 7. Frequently Asked Questions
- 8. How To...
- 9. JOpera Visual Composition Language Reference
- 10. Feature Reference
- 11. Lineage Tracking
- 12. How to write Service Invocation Plugins
- 13. Library Reference
- 14. Component Type Reference
- 15. How to write Documentation
- Publications
- Research
- Screenshots
- Talks
- Videos
- Workflow Patterns
- FAQ
- Manual
- Download JOpera
- Forums
- Search
12. How to write Service Invocation Plugins
Wed, 10/13/2010 - 10:41 — frisonim
Note: You can find more information on http://www.eclipse.org/articles/Article-Your%20First%20Plug-in/YourFirstPlugin.html on how to write and run Eclipse plugins.
12.1: Adapter Metaphor
The theory behind JOpera's adapters is described in this paper:
http://www.jopera.org/docs/publications/2004/megaprogramming
.
An adapter maps a high-level abstract service invocation down to a well define concrete binding to a particular service invocation technology.
Adapters bound to services are configured at design time through a set of system parameters defined with a .oml file passed to the JOpera core plugin (12.5: The OML Component Type Definition).
At run time, the system parameter values, which specify how to invoke the service based on the type of the adapter, are passed to the actual adapter implementation which is plugged into the JOpera kernel plugin (12.6: The ISubSystem Interface).
The goal of this chapter is to describe what kind of parameters can be used to model a certain type of service invocation mechanism, and also to discuss different interaction patterns
supported by the JOpera kernel adapter interface called ISubSystem.
12.2: Example service invocation plugin
To get started, you can download from the JOpera website http://www.jopera.org/download/demos a sample Hello World demo adapter.
12.3: Setting up a new service invocation plugin
This section describes how to create a new Eclipse plugin which extends the extension-points needed to insert a service invocation plugin into JOpera.
A new Eclipse plugin project should be created with a dependency to the ch.ethz.jopera.kernel and ch.ethz.jopera.core plugins.
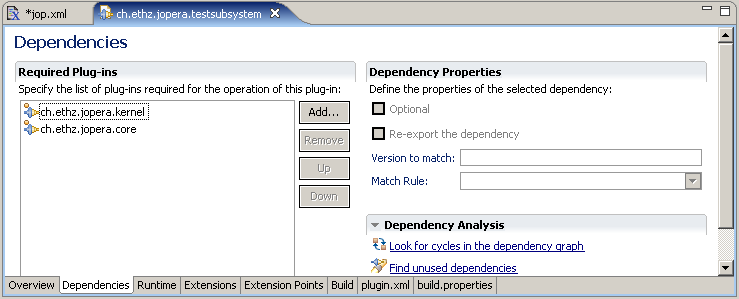
Figure 12.1: Dependencies of a Subsystem plugin
-
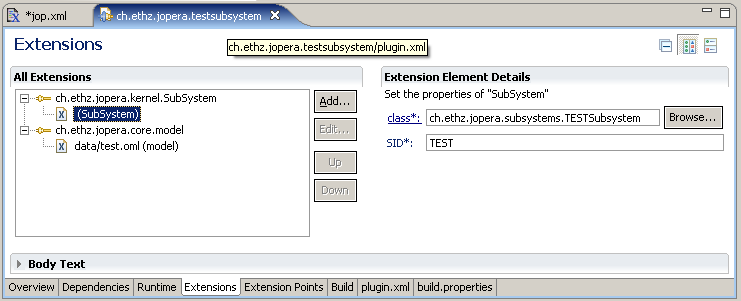
The first extension plugs into the JOpera kernel a new service invocation adapter class.
- Add a
ch.ethz.jopera.kernel.SubSystemextension - Right click it and add a new
SubSystemelement - Enter the Subsystem ID ('SID'), which uniquely identifies the type of service that are going to be invoked through the SubSystem. As an example, in this tutorial we use
TEST - Enter the name of the Java class which will implement the
ISubsysteminterface. See 12.6: The ISubSystem Interface for more information on which methods of this interface should be implemented
- Add a
-
The second extension defines the system parameters that describe how the service type should be invoked. This information is described in an OML file that should be packaged with the plugin.
- Add a
ch.ethz.jopera.core.modelextension - Right click it and add a new
modelelement - Browse for the OML file which defines the system parameters that will be passed to the subsystem when invoking services of the corresponding type. We will describe the structure of this file in 12.5: The OML Component Type Definition
- Add a
12.4: Identifying Component Types
JOpera manages a list of adapters that are provided by its plugins, as shown in Figure 12.3.
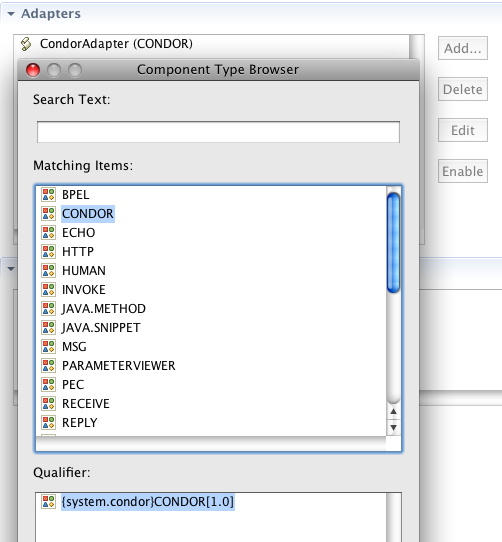
Figure 12.3: List of Component Types declared by JOpera adapters
ISubSystem interface.
The code of the adapter will be called when a program bound to the corresponding component type is executed by the JOpera engine.
The adapter code receives the data used to invoke the corresponding service. This data is structure according to the corresponding component type definition.
Note: It follows that the component type name (and the corresponding Subsystem ID) should be unique Additionally, also the name of the OML file where the component type is declared should be unique among all adapters that are plugged into JOpera. This file name is shown to the user in the Qualifier at the bottom of the Component Type Browser (Figure 12.3).
Note: Versioning Component Types: Whereas component type definitions can be associated with a version number, it is currently not possible to attach version identifiers to the Subsystem ID. Therefore, whereas at design-time JOpera process models can be bound to multiple versions of a component type, all versions will be executed with the same adapter code (which typically works with the latest version of the component type and should be kept backwards compatible)
12.5: The OML Component Type Definition
A OML component type definition file can actually store multiple definitions provided by the same adapter plugin.
12.5.1: Defining System Parameters
A component type models a certain service invocation mechanism using a set of input and output parameters. The following example models the invocation of UNIX command lines and the invocation of RESTful Web services through HTTP.
<OCR>
  <COMPS>
    <COMP>
      <INBOX>
        <PARAM></PARAM>
        <PARAM></PARAM>
        <PARAM></PARAM>
        <PARAM></PARAM>
      </INBOX>
      <OUTBOX>
        <PARAM></PARAM>
        <PARAM></PARAM>
        <PARAM></PARAM>
        <PARAM></PARAM>
      </OUTBOX>
    </COMP>
    <COMP>
      <INBOX>
        <PARAM></PARAM>
        <PARAM></PARAM>
        <PARAM></PARAM>
        <PARAM></PARAM>
      </INBOX>
      <OUTBOX>
      	<PARAM></PARAM>
        <PARAM></PARAM>
      	<PARAM></PARAM>
      </OUTBOX>
    </COMP>
  </COMPS>
</OCR>
Each element of the definition has a NAME identifier (which is shown to the user) and an OID identifier (which is used internally to reference the elements of the definition). Additional documentation can be entered in the DESC field.
Parameters are grouped into input and output parameters. Input parameters are filled in by JOpera and passed to the adapter code carrying the information used to start the service invocation.
Output parameters are filled in with the result of the invocation by the adapter so that JOpera can store the results and forward it to the next tasks of the workflow.
12.5.2: Editing System Parameters with the Adapter Editor
Users can configure the adapter by binding the corresponding component type to a program. Its input parameters are visualized to the user in the adapter editor tab and can be set to configure the information required to invoke a certain kind of service.
The adapter plugin does not need to implement such editor, as it is automatically built by JOpera based on the component type definition.
The UNIX adapter input parameters are shown in Figure 12.4. You can open the notepad.oml example to test the UNIX adapter.
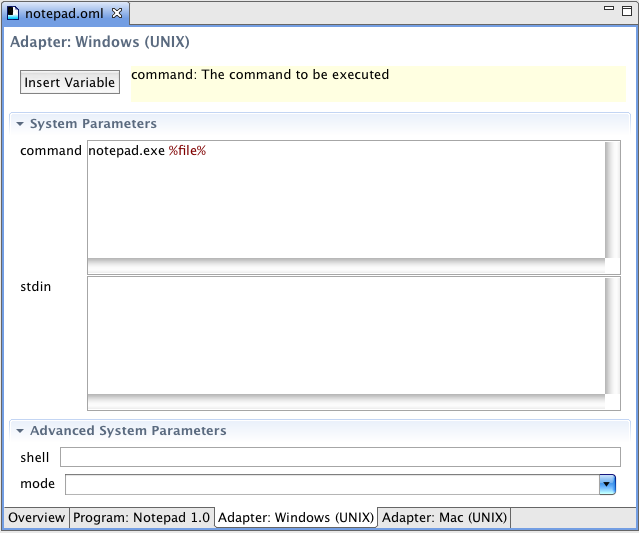
Figure 12.4: The UNIX adapter input parameters displayed in the adapter editor tab
doodlemashup.oml example to test the HTTP adapter.
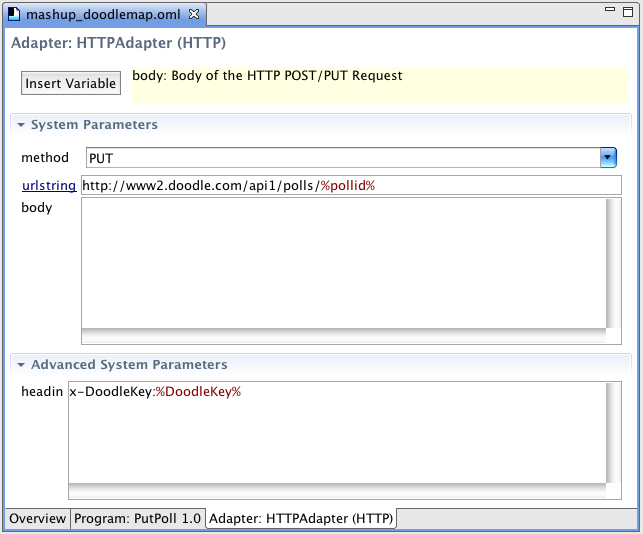
Figure 12.5: The HTTP adapter input parameters displayed in the adapter editor tab
Note:
To reduce clutter, since version 2.4.3., optional parameters that do not require to be configured can be grouped in the Advanced System Parameters section.
12.5.3: System Parameter Types
| Simple Parameter Types | |
|---|---|
| String | the default type, it corresponds to a single line edit box in the adapter editor |
| Text | shown with a multi-line edit box in the adapter editor |
| URI | a single line edit box. The label with the name of the parameter can be clicked to open the URI in a Web browser |
| Serializable | parameters of this type are hidden from the adapter editor and are meant to be set using the data flow editor |
| File |
a single line edit box, with a Browse button that can be used to locate files on the local disk. The parameter name will be highlighted as a hyperlink. Clicking on it will open an Eclipse editor showing the content of the file name entered in the parameter. (Since version 2.4.3) |
| Enumerated Parameter Types | |
|---|---|
| Enum:a,b,c |
rendered with a combo-box initialized using the a,b,c elements |
| Boolean | equivalent to Enum:true,false |
Note:
Enumerated types are only used to suggest to the user a set of possible values. The actual values entered by the users are currently not checked at design-time to be restricted to the enumerated elements. Thus, using Enum types does not remove the need for input validation at run time by the subsystem adapter
| Types with syntax highlighting | |
|---|---|
| XML | a multi-line editor with XML Syntax highlighting |
| Code:Java | an editor used for Java snippets (Java syntax highlighting not yet implemented) |
| Type Tags | |
|---|---|
| Advanced |
As shown in the previous examples, tagging parameter types with Advanced will display the corresponding parameter in the Advanced System Parameters section. This should be used only for optional parameters, for which a reasonable default can be automatically provided by the Adapter (since version 2.4.3) |
12.6: The ISubSystem Interface
This interface must be implemented by all service invocation plugins. It contains only two methods.
-
public void Execute(IJob Job);
TheExecutemethod is called by JOpera to invoke a service. The information controlling the invocation is stored in the IJob parameter. -
public State Signal(int Signal);
TheSignalmethod is used by JOpera to interact with an active invocation, e.g., in order to abort it. As a first approximation, it is not necessary to implement this method, as it may not always be required to provide such advanced functionality.
12.7: The IJob Interface
The information describing the service invocation to be performed by the plugin is packaged into an IJob object, which
is passed as a parameter to the execute method. This object is used to store all input/output parameters of the
service invocation, and also to inform JOpera of the final outcome of the invocation, i.e., whether it was successful or it failed.
The most important methods of IJob are:
- getInput()
- getActiveCommand()
- getOutput()
- getSystemOutput()
- setState()
- notifyFinished()
12.8: Control flow mapping
The execute method of the ISubSystem interface is called by JOpera in a dedicated thread to perform the transfer of control from a running task to the corresponding service provider.
This can happen synchronously (a thread waits) or asynchronously (initiated by a thread and completed by another).
12.8.1: Synchronous Service Invocation
In the simplest case, this happens synchronously. This means that the service invocation is completed by the time the execute method returns.
This is straightforward to implement as all the code for initiating the invocation (e.g., sending a request to the service provider)
and completing it (e.g., reading and decoding the response) is contained in the execute method, which can be structured in the following three steps
- Call the service provider
- Wait for an answer
- Retrieve the response
12.8.2: Asynchronous Service Invocation
Depending on whether the service is invoked locally or remotely and depending on how long the service invocation typically lasts, it
may not be efficient to keep waiting for an answer as this keeps the thread running the execute method busy.
To address this problem, as an alternative, it is also possible to use the execute method to only perform step 1., i.e., initiate the call, and
handle the other steps asynchronously so that the thread invoking the service does not block and can be used by JOpera to run other tasks.
In this case, it is the responsibility of the service invocation plugin to notify JOpera whenever it detects that the
service has completed its execution. Since the execute method has already returned, the plugin must use its own thread to run the following code:
job.setState(State.FINISHED);
job.notifyFinished();
This code will inform JOpera of the asynchronous completion of the
job representing the service invocation.
12.9: Failure detection
It is the responsability of the plugin to provide the necessary logic to detect whether a service invocation was successful. To do so, a successful invocation should use the following code:
job.setState(State.FINISHED);If a failure occurred, e.g., a timeout, or any kind of exceptional condition has been detected, JOpera can be notified with the following:
job.setState(State.FAILED);Additional information about the failure, e.g., describing its cause with some error messages, can be stored in the plugin-specific system output parameters.
12.10: Data flow mapping
In addition to transferring control, the service invocation adapter is responsible for transferring data between JOpera and the service provider for the specific kind of service. The subsystem is responsible for implementing the required encoding/decoding of the data.
JOpera structures the data parameters exchanged with the subsystem as follows. First of all, a distinction is made between input and output data parameters. From the point of view of the service, input data is sent as part of the request, whereas output data is retrieved as part of the response.
JOpera also distinguishes between application-level data from system-level metadata.
The IJob interface provides access to all of these parameters, identified by their name, through the following Maps
- 'public Map getInput();' //get input data parameters
- 'public Map getActiveCommand();' //get input metadata parameters (read-only)
- 'public Map getOutput();' //set output data parameters
- 'public Map getSystemOutput();' //set output metadata parameters
Note:
The values for the parameters stored in these maps can be set to any Java Serializable data type.
12.11: Threading model
JOpera instantiates a new object of the given service invocation plugin class for each service invocation to be performed.
Furthermore, JOpera calls the execute method of the newly created object from within a dedicated thread.
Therefore, since JOpera already handles the multithreaded issues for the concurrent invocation of multiple services,
the plugin -- under normal circumnstances -- should not have to fork off additional threads to perform the invocation.
12.12: Example Code for Synchronous invocation
void Execute(IJob job)
{

	//take the system input parameters
	Map c = job.getActiveCommand();

	//do something with it!

	//set system output parameters
	job.getSystemOutput().put("sys_output",...);

	//set output parameters
	job.getOutput().put("output",...);

	//detect failures (somehow) and set the outcome of the job
	if (ok)
		job.setState(State.FINISHED);
	else
		job.setState(State.FAILED);

}
12.13: Example Code for Asynchronous invocation
void Execute(IJob job)
{

	//take the system input parameters
	Map c = job.getActiveCommand();

	//start running something with it!

	//do not change the state of the job

}


//it is the responsability of the plugin to call this method
//from its own thread whenever the service invocation has completed
//asynchronously
void Complete(IJob job)
{

	//set system output parameters
	job.getSystemOutput().put("sys_output",...);

	job.getOutput().put("output",...);

	if (ok)
		job.setState(State.FINISHED);
	else
		job.setState(State.FAILED);

	//notify JOpera about it
	job.notifyFinished();
}
12.14: Example Code for partial result notification
12.15: Example Code for progress notification
12.16: Example Code for safe streaming intermediate output
12.17: Example Code for the Signal Method
This is the simplest implementation of the signal method. No matter what signal is given to the subsystem, the state of its job is left unmodified, i.e., it remains Running.
	public State Signal(int Signal)
	{
		//by default indicate that the signal
		//did not affect the running job
		return State.RUNNING;
	}